
Marble Floor Installation
Marble Floor Installation: A Comprehensive Guide to a Timeless Look
Marble floors are a symbol of luxury, elegance, and timeless beauty. Installing marble flooring can elevate the look of any room, whether it's a bathroom, kitchen, or living area. If you're considering this exquisite option for your home or business, understanding the marble floor installation process is crucial for a successful outcome. In this guide, we’ll walk you through the steps involved in installing marble flooring, the benefits, and tips to ensure your installation goes smoothly.
Why Choose Marble Flooring?
Marble is a naturally beautiful stone, known for its stunning veining and unique patterns. It’s durable, easy to clean, and adds a touch of sophistication to any space. Here are some key benefits:
- Elegance and Aesthetic Appeal: The unique veins and rich patterns in marble create an elegant atmosphere that no other material can match.
- Durability: Marble floors are durable, capable of withstanding heavy foot traffic without significant wear and tear.
- Longevity: Marble floors can last for decades when properly maintained, making them a long-term investment.
- Easy Maintenance: While marble does require some care to avoid staining, its smooth surface is easy to clean with mild detergents.
Steps in Marble Floor Installation
-
Preparation and Planning The first step in any marble floor installation is preparation. This includes choosing the right marble slabs, measuring your space, and preparing the surface. If the existing floor is uneven, it may need to be leveled before proceeding.
Pro Tip: Select a marble pattern that complements the room’s color palette and design style. Consider a polished finish for a glossy look or a honed finish for a matte appearance.
-
Subfloor Installation The subfloor must be solid and smooth to ensure a perfect marble installation. This could be concrete or plywood, depending on the room and the structure of your home. Any cracks or imperfections should be repaired to avoid shifting or damage in the future.
-
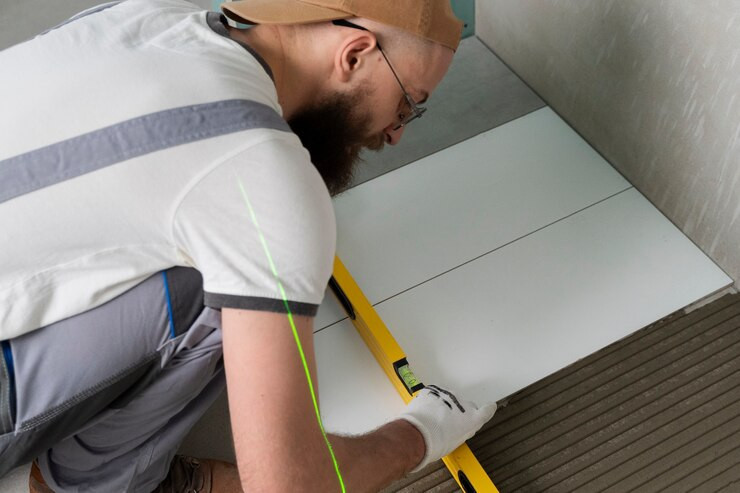
Laying the Tiles Begin by laying down a thin layer of thin-set adhesive to ensure proper bonding. Start from the center of the room and work your way outward to maintain symmetry. Leave small gaps (typically 1/8” to 1/4”) between the tiles for grout.
-
Cutting Marble Tiles As you work around corners, doorways, and walls, you may need to cut the tiles to fit. Use a wet saw to cut the marble tiles to the desired size. Always ensure you wear protective gear like goggles and gloves while cutting.
-
Grouting After the tiles are set, grout is applied to fill the gaps between the tiles. Ensure the grout is smooth and consistent for a clean finish. Once the grout dries, remove any excess with a damp sponge.
-
Sealing the Marble After installation, it’s essential to seal your marble floors to prevent staining. Choose a high-quality stone sealer and apply it in thin layers to ensure the stone is protected. Regular sealing is recommended every 1-2 years.
-
Final Inspection and Cleaning Once the sealer has dried, inspect the floor for any imperfections. Clean the floor thoroughly to remove any residue from the grout or adhesive. This step will help your marble floor shine and look its best.
Tips for Successful Marble Floor Installation
- Hire Professionals: While DIY installation is possible, marble floor installation requires precision. Hiring an experienced installer ensures that the marble is cut, placed, and sealed correctly.
- Acclimate the Marble: Before installation, allow the marble tiles to acclimate to the room’s temperature. This will prevent the material from expanding or contracting after installation.
- Avoid Heavy Traffic During Installation: During installation and curing, avoid walking on the floor to ensure the marble stays in place and the grout cures properly.
Marble Floor Maintenance
To keep your marble floors looking their best for years to come, follow these simple maintenance steps:
- Regular Cleaning: Sweep or vacuum your marble floors regularly to remove dust and debris. Use a damp mop with a pH-neutral cleaner to maintain its shine.
- Avoid Acidic Cleaners: Do not use acidic cleaners like vinegar or lemon juice, as they can etch and damage the marble surface.
- Prompt Stain Removal: If a spill occurs, wipe it up immediately to prevent staining. Marble is porous and can absorb liquids if left unattended.
Conclusion
Marble floor installation is a detailed process that, when done correctly, can transform your space with luxury and elegance. Whether you're adding marble floors to your home or business, it’s essential to follow the proper steps and maintenance practices to ensure longevity. At SF Marble & Granite Inc., we specialize in marble floor installations, offering professional services to give you the perfect finish for your home or office.
If you’re ready to install marble floors, get in touch with us for expert advice and a free consultation.


![Poly-L-Lactic Acid (PLLA) Filler Market [New Report] by Updated Development 2033](https://timessquarereporter.com/public/index.php/upload/media/posts/2025-04/21/poly-l-lactic-acid-plla-filler-market-new-report-by-updated-development-2033_1745221949-s.jpg)


Comments
0 comment