
Leather jackets are timeless fashion staples that can express your personality, elevate your wardrobe, and serve as durable pieces for years to come. However, customizing a leather jacket is a commitment: one wrong cut, patch, or dye can leave you regretting the decision. In this comprehensive guide, you'll learn how to personalize a leather jacket in a way that ensures satisfaction and style, step by step. Whether you’re aiming for subtle detailing or a bold statement piece, our tips are tailor-made to help you transform any jacket into a wearable work of art.
Table of Contents
- Why Customize a Leather Jacket?
- Key Considerations Before You Begin
- 2.1 Material and Quality
- 2.2 Design Vision
- 2.3 Function vs. Form
- Gathering Tools and Supplies
- Preparation: Clean, Condition, and Protect
- Design Planning and Sketching
- Color and Dye Techniques
- 6.1 Leather Paint vs. Dye
- 6.2 Step-by-Step Dye Process
- Adding Embellishments: Patches, Studs, and Pins
- 7.1 Choosing the Right Patches
- 7.2 Attaching Studs and Rivets
- 7.3 Pin Placement Tips
- Hardware Replacement and Upgrades
- 8.1 Zippers and Buckles
- 8.2 Buttons and Snaps
- Stitching and Leather Repairs
- 9.1 Basic Leather Stitching
- 9.2 Patch Repairs
- Distressing for a Vintage Look
- 10.1 Tools for Distressing
- 10.2 Techniques to Master
- Finishing Touches and Protective Coatings
- Styling Your Bespoke Piece
- Maintenance and Care for Your Customized Jacket
- When to Seek Professional Assistance
- Conclusion
Why Customize a Leather Jacket?
Customizing a leather jacket allows you to stand out in a crowd, turning a classic wardrobe staple into a personal signature piece. Mass-produced designs can be generic, but when you tailor a jacket to your taste—through color, texture, and details—you create something uniquely yours. Whether you’re inspired by music subcultures, film icons, or street art, customizing ensures your jacket reflects your lifestyle and values.
Key Considerations Before You Begin
Before reaching for scissors or dye, ask yourself the following:
Material and Quality
Not all leather is created equal. Full-grain leather will absorb dye more evenly and hold up better under stress than bonded or faux leather. Investigate your jacket’s tag or product information to confirm it’s genuine cowhide, lambskin, or goatskin. A high-quality base ensures your customization lasts longer and looks better.
Design Vision
A clear vision prevents impulsive choices that lead to regret. Do you want a minimal accent—like a contrasting zipper color—or an all-over design, such as hand-painted artwork? Jot down sketches or mood boards to refine ideas before making permanent alterations.
Function vs. Form
Consider how often and where you’ll wear the jacket. If it’s an everyday piece, avoid bulky embellishments that could snag on door frames or restrict movement. For a showpiece you wear sparingly, you can afford more daring hardware and paint.
Gathering Tools and Supplies
Having the right tools on hand streamlines the process and minimizes mistakes. Here’s a checklist:
- Leather cleaner and conditioner
- Soft cloths and foam brushes
- Leather-specific dye or paint
- Painter’s tape and stencils
- Leather patching kit
- Replacement zippers, snaps, and buckles
- Stud and rivet kit with pliers
- Heavy-duty needle and waxed thread
- Fine grit sandpaper or sanding block
- Protective gloves and apron
Preparation: Clean, Condition, and Protect
Proper surface prep is crucial. Here’s how:
- Spot-clean any stains with leather cleaner.
- Wipe down with a damp cloth to remove residue.
- Allow the jacket to dry completely at room temperature.
- Condition the leather to restore oils lost during cleaning.
- Mask off areas you don’t want dyed or distressed using painter’s tape.
These steps ensure dye adheres uniformly and that subsequent work doesn’t degrade the leather.
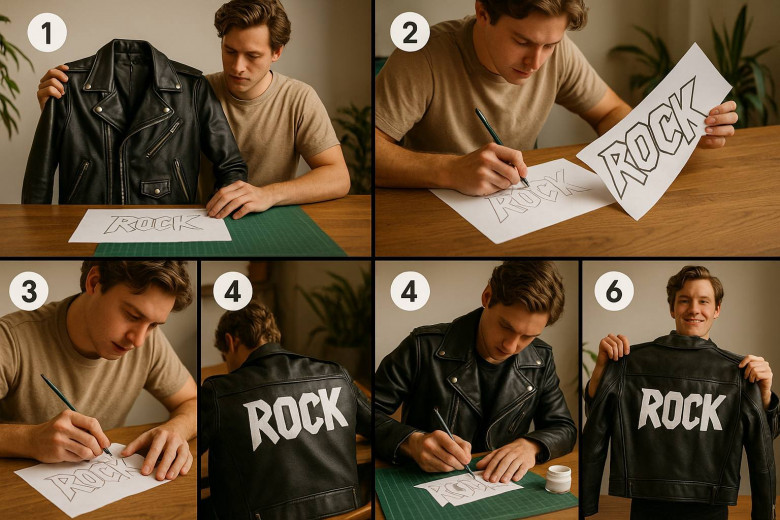
Design Planning and Sketching
Translate your mood board into precise sketches. Use paper templates or tracing paper directly on the jacket to test your layout. If you’re adding painted designs, practice on scrap leather or an inconspicuous jacket panel first. Mapping out your work reduces asymmetry and misplacement errors.
Color and Dye Techniques
Leather Paint vs. Dye
- Dye penetrates leather, offering a natural, translucent finish. It’s ideal for changing an entire color or achieving rich, even tones.
- Paint sits on the surface, allowing for vibrant, opaque artwork and sharp lines. It’s perfect for detailed graphics or multicolor designs.
Step-by-Step Dye Process
- Mix dye according to manufacturer instructions; test on scrap material.
- Apply with foam brush in thin, even coats, working in straight strokes.
- Wipe off excess immediately with a clean cloth to avoid blotches.
- Repeat coats until desired depth is reached, allowing each layer to dry fully.
- Seal dye with a leather finisher to protect against UV and moisture.
Adding Embellishments: Patches, Studs, and Pins
Choosing the Right Patches
Whether embroidered, leather, or woven, patches can tell a story. Opt for adhesive-backed patches for minimal commitment, or sew-on variants if you want permanence. Position them on shoulders, back panels, or sleeves—areas that showcase design without crowding.
Attaching Studs and Rivets
Studs and rivets add texture and edge. Mark placement with chalk, then punch pilot holes with an awl. Use pliers to secure rivets or press studs per kit instructions. Start with a small group to perfect your spacing before tackling larger sections.
Pin Placement Tips
Pins and brooches offer versatile flair. Cluster small pins near lapels for a punk vibe, or mix larger pins on the back panel to create a gallery effect. Because pins are removable, they allow experimentation without permanent changes.
Hardware Replacement and Upgrades
Zippers and Buckles
Swapping original hardware for colored or metal alternatives elevates style. Use a seam ripper to remove old stitching, then hand-sew in a new zipper with heavy-duty thread. Brass or contrasting-colored zippers can become focal points.
Buttons and Snaps
Replace plastic snaps with press studs in silver or brass. Punch holes carefully to match original spacing. Snap kits often include a die set for home installation.
Stitching and Leather Repairs
Basic Leather Stitching
Repair small tears or attach patches permanently using a saddle stitch. Double-thread a heavy-duty needle, knot ends, and sew with even backstitches. Trim thread and burnish ends with edge paint.
Patch Repairs
Large gouges may require patching from the inside. Cut a leather scrap slightly larger than the hole, glue inside, then stitch around perimeter. Finish edges with sandpaper and dye to blend.
Distressing for a Vintage Look
Tools for Distressing
- Fine and medium grit sandpaper
- Steel wool
- Metal brush or wire pad
- Leather distress kits
Techniques to Master
- Edge wear: Sand sleeve and hem edges for a naturally worn look.
- Crease highlights: Rub steel wool across folds for subtle color shifts.
- Scuff patches: Gently scuff high-contact areas to simulate years of wear.
Move in small increments; you can always distress more but can’t reverse excess wear.
Finishing Touches and Protective Coatings
Seal and protect your hard work with these steps:
- Apply a leather protector spray for water resistance.
- Use a matte or satin finisher to lock in paint or dye.
- Buff gently with a soft cloth to achieve the preferred sheen.
Protection prevents fading, cracking, and ensures longevity.
Styling Your Bespoke Piece
Customized jackets work with a variety of outfits:
- Casual: Pair a distressed leather jacket with jeans and boots for effortless cool.
- Formal edge: Layer over a crisp white shirt and tailored trousers to add rebellion to suiting.
- Layered: Throw on a hoodie under the jacket for streetwear vibes.
Experiment with accessories—scarves, hats, and bags can complement or contrast your jacket details.
Maintenance and Care for Your Customized Jacket
Routine care preserves customization:
- Spot-clean minor dirt with a damp cloth.
- Condition leather every 3–6 months.
- Store on a wide, padded hanger in a cool, dry place.
- Avoid direct sunlight for extended periods to prevent fading.
When to Seek Professional Assistance
If your project involves structural alterations—like resizing or intricate embroidery—consider a leather specialist. Professionals have industrial tools and experience to handle complex tasks without compromising jacket integrity.
Integrating Quality Items
Choosing the right jacket to start with makes customization easier. Many enthusiasts recommend investing in Best leather jackets for a durable base that responds well to dye and stitching. For those looking specifically for tailored fits, exploring best leather jackets for men ensures a range of styles designed for comfortable, stylish wear. If you prefer to bypass the DIY process, ordering custom made jackets from experienced craftsmen can save time and guarantee professional results.
Conclusion
Customizing a leather jacket is an art that blends creativity, craftsmanship, and careful planning. By choosing quality materials, sketching thoughtfully, and mastering techniques from dyeing to distressing, you can create a bespoke piece that feels like an extension of your identity. Follow these steps, take your time, and don’t be afraid to iterate. With patience and practice, you’ll transform a classic wardrobe staple into a statement that turns heads—for all the right reasons.


Comments
0 comment