
In the vibrant world of 3D modeling games, the smallest object can make the biggest impact. From a discarded tire on the roadside to an ancient chest tucked in a dungeon corner, every in-game object—better known as a "prop"—plays a vital role in storytelling and immersion. However, in an industry where visuals meet performance, optimizing these props is critical for maintaining smooth gameplay without compromising quality.
In this blog, we’ll explore the journey of props—from initial sketches to final implementation—highlighting the best practices for optimizing props 3D model for performance in real-time 3D game environments.
Why Props Matter in 3D Game Environments
These elements add realism, provide environmental storytelling, and populate otherwise empty spaces. Imagine a sci-fi city without antennas, crates, and scattered debris—it would feel unnaturally sterile. Too much detail can tank frame rates; too little, and the world feels unconvincing.
Step 1: Ideation and Conceptualization
Every great prop starts with a concept. Artists begin with rough sketches or mood boards that align with the game’s visual language. Whether you’re crafting a car 3D model for a racing game or a broken lamppost for a horror scene, the concept sets the tone.
During this phase, it's crucial to define:
-
The prop’s role in gameplay.
-
Level of player interaction.
-
Camera proximity (first-person or top-down?).
This information determines the necessary level of detail in 3D environment modeling.
Step 2: Blocking Out the Model
Before jumping into detail, artists block out the basic shape of the prop using simple geometry. This step focuses on scale and proportion within the 3D game environment.
For instance, when designing a 3D vehicle modeling asset like a car, an artist might block out the overall body and wheels to ensure realistic dimensions. This ensures props are visually consistent and technically sound across the game world.
Step 3: High-Poly Modeling
Once the block-out is approved, it's time for high-poly modeling. This is where the prop gets its detail—beveled edges, intricate engravings, or realistic damage. Artists focus on clean edges, chamfers, and paneling that mimic real-world physics.
High-poly versions may not make it to the game directly but serve as the basis for the optimized, game-ready version.
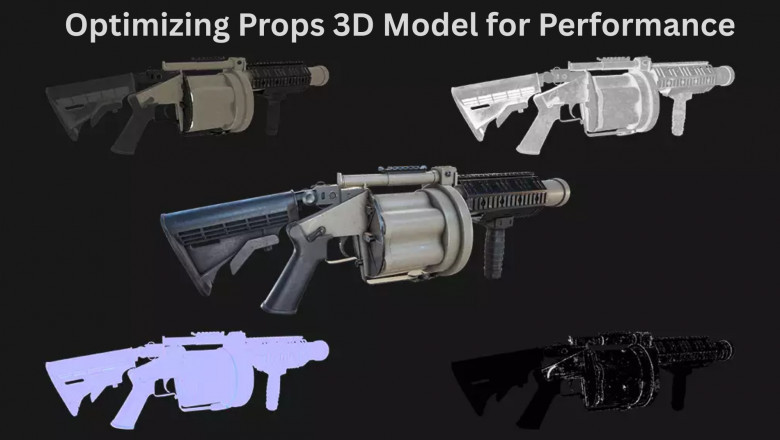
Step 4: Retopology – The Art of Optimization
Here comes the technical magic. Efficient edge loops, polygon reduction, and smart UV layout are critical here. An optimized props 3D model maintains shape fidelity without wasting resources. For example, circular props may use as few as 8–12 edges instead of dozens, saving precious processing power.
Step 5: Baking and Texturing
To transfer the high-poly detail onto a low-poly model, artists use a process called baking. This creates normal, ambient occlusion, and curvature maps that simulate depth and lighting effects.
With baked maps in hand, texturing begins. Tools like Substance Painter or Quixel help generate PBR (Physically Based Rendering) textures. These textures are resolution-optimized to enhance the realism of 3D game assets without bloating memory usage.
For props used frequently—like fences, barrels, or crates—texture atlasing can combine multiple props into a single material sheet, further boosting performance.
Step 6: LODs.
As players move around the 3D game environment, not all props must be rendered at the same detail. LODs (Level of Detail) are versions of the prop that use decreasing complexity based on camera distance.
Take a car 3D model, for instance. At close range, it may have all the bells and whistles—grills, mirrors, reflections. At a distance, a simplified version swaps in to save performance.
Instancing is another powerful trick. When the same props 3D model appears multiple times—say, identical lamp posts or road signs—instancing allows the game engine to load one model but display it repeatedly, reducing GPU load.
Step 7: Integration and Testing
After optimization, props are imported into game engines like Unity or Unreal. Artists test them within the 3D game environments for lighting, collision, interaction, and performance metrics.
Here, material tweaking, LOD switching, and collision mesh adjustments take place. A 3D vehicle modeling prop, for example, might need accurate wheel collisions and suspension settings for gameplay purposes.
Step 8: Profiling and Performance Tweaks
Modern 3D modeling games require frame-perfect execution, especially on lower-end devices or VR platforms.
-
Draw calls
-
Frame rate drops
-
Shader complexity
-
Texture memory usage
If a Hard Surface Modeling prop causes performance dips, artists might simplify shaders, lower texture resolutions, or reduce the number of real-time lights interacting with the prop.
Prop Optimization in Different Game Genres
Optimization strategies vary depending on the game genre:
Racing Games
Emphasis on detailed car 3D model with reflective shaders and precise physics. LODs are critical at high speeds.
Open-World Games
Texture atlasing, instancing, and LODs are the MVPs here.
First-Person Shooters
Props need high detail up close. Efficient 3D hard surface modeling ensures realism without lag during intense moments.
Mobile Games
Everything is ultra-optimized. From 3D game assets to 3D vehicle modeling, poly counts are kept ultra-low and shaders minimal.
The Future of Prop Optimization
With next-gen consoles and powerful GPUs, the potential for ultra-detailed 3D game assets continues to grow. However, optimization will always remain relevant. Technologies like Nanite (from Unreal Engine) and virtual texturing are redefining what’s possible while maintaining top performance.
Final Thoughts
Optimizing props from concept to console is a journey that blends artistry with technical prowess. In today’s fast-paced 3D modeling games industry, knowing how to deliver high-quality 3D game assets that don’t bog down performance is a prized skill.
Whether you’re modeling an ancient artifact or a futuristic 3D vehicle model, always keep one thing in mind: if the player doesn't notice the prop, it's doing its job perfectly.


Comments
0 comment