
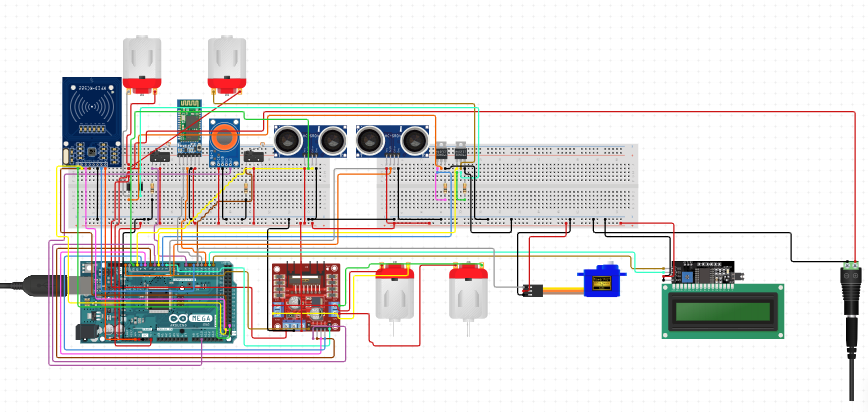
Hover Car Floating Car project aims to create a hover floating car that navigates on water using motors and fans, detects obstacles using two ultrasonic sensors, and can be controlled via a Bluetooth app. The car includes an alcohol detector to stop the motor when alcohol is detected, an RFID system with a servo motor for secure locking inside the car, and an I2C display to show messages.
Components Required
- Arduino MEGA – 1
- Ultrasonic Sensors (e.g., HC-SR04) – 2
- Bluetooth Module (e.g., HC-05) – 1
- DC Motors – 4 (2 for propulsion with motor driver, 2 for auxiliary functions with switches)
- Motor Driver (e.g., L298N) – 1
- Alcohol Sensor (e.g., MQ-3) – 1
- RFID Module (e.g., MFRC522) – 1
- Servo Motor – 1
- I2C LCD Display – 1
- Switches – 2 (for controlling auxiliary motors)
- Breadboard and Jumper Wires – Several
- Power Supply – For Arduino and motors
- Hovercraft body – For the floating base
Connections
Arduino to Ultrasonic Sensors:
- Ultrasonic Sensor 1:
- Trig to D2
- Echo to D3
- VCC to 5V
- GND to GND
- Ultrasonic Sensor 2:
- Trig to D4
- Echo to D5
- VCC to 5V
- GND to GND
Arduino to Bluetooth Module (HC-05/HC-06):
- Bluetooth TX to Arduino RX (pin 11)
- Bluetooth RX to Arduino TX (pin 10)
- Bluetooth VCC to 5V
- Bluetooth GND to GND
Arduino to Motor Driver (L298N):
- Motor 1:
- Connected to Motor A output of L298N
- Motor 2:
- Connected to Motor B output of L298N
- L298N Inputs:
- IN1 to 6
- IN2 to 3
- IN3 to 7
- IN4 to 2
- L298N Enable Pins:
- ENA to D8
- ENB to D9
Arduino to Alcohol Sensor:
- AO (Analog Output) to A3
- VCC to 5V
- GND to GND
Arduino to RFID Module:
- SDA to 53
- SCK to D13
- MOSI to D11
- MISO to D12
- RST to 15
- VCC to 3.3V
- GND to GND
Arduino to Servo Motor:
- Signal to D12
- VCC to 5V
- GND to GND
Arduino to I2C Display:
- SDA to A4
- SCL to A5
- VCC to 5V
- GND to GND
Switches to Additional DC Motors:
- DC_MOTOR_Switch 1:
- One terminal to motor 1 positive terminal
- Others terminal to motor 1 negative terminal and 5V through a pull-down resistor
- Switch pin to Arduino D14
- DC_MOTOR_Switch 2:
- One terminal to motor 2 positive terminals
- Others terminal to motor 2 negative terminal and 5V through a pull-down resistor
- Switch pin to Arduino D16
Contact us at:
STEMROBO Technologies Private Limited
Toll Free: 1800-120-500-400
Email: sales@stemrobo.com
Website: www.stemrobo.com


