
Digitizing for Embroidery: The Science Behind Flawless Stitch Conversion
In today's world of embroidery, digitizing for embroidery has revolutionized the industry by transforming artwork into machine-executable stitch patterns. This technical process demands precision, expertise, and the right tools to ensure high-quality embroidery output. Whether you're a designer, business owner, or embroidery enthusiast, understanding digitizing can elevate your designs from ordinary to extraordinary.
What is Digitizing for Embroidery?
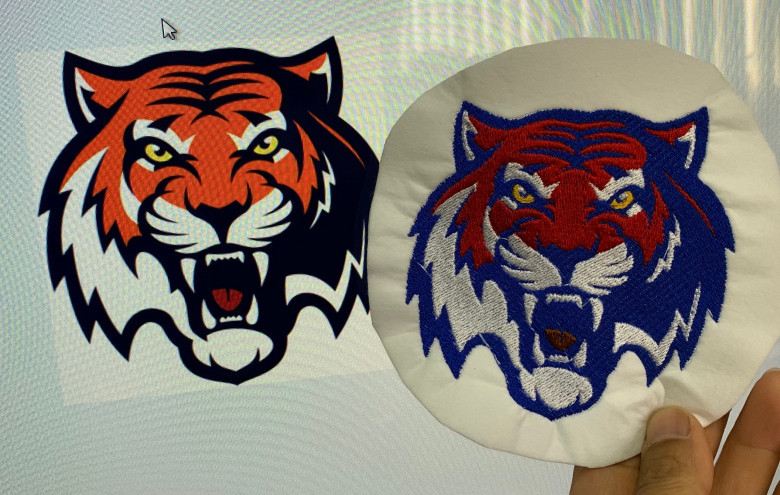
Digitizing for embroidery is the process of converting a digital image into a stitch file that an embroidery machine can interpret. Unlike traditional graphic design, this method involves defining stitch types, angles, densities, and sequencing to ensure a seamless stitch flow. A well-digitized design not only enhances clarity but also prevents issues like thread breaks, misalignment, or excessive stitch density.
The Step-by-Step Digitizing Process
To create a high-quality embroidered design, digitizers follow these critical steps:
-
Artwork Preparation – The image is cleaned, simplified, and adjusted to suit embroidery requirements.
-
Stitch Type Selection – Various stitch types (such as satin, fill, and run stitches) are assigned based on design elements.
-
Pathway Optimization – Stitch direction and sequence are strategically mapped to minimize jump stitches and improve efficiency.
-
File Conversion – The design is saved in a compatible format for the embroidery machine (e.g., DST, PES, EXP).
-
Test Run & Adjustments – A sample embroidery is produced to check for errors, ensuring the final output is flawless.
Choosing the Best Embroidery Digitizing Software
High-quality digitizing for embroidery relies on robust software. Some leading options include:
-
Wilcom Embroidery Studio – Industry-standard software known for its professional-grade features.
-
Hatch Embroidery – Offers intuitive controls suitable for beginners and advanced users alike.
-
Brother PE-Design – Specifically optimized for Brother embroidery machines.
-
Embird – Modular software that allows users to customize their experience based on their needs.
-
Ink/Stitch – A free, open-source solution for hobbyists exploring embroidery digitizing.
Why High-Quality Digitizing Matters
Precision in digitizing directly impacts embroidery quality. A well-digitized design provides:
-
Enhanced Stitch Accuracy – Clear, crisp lines and minimal distortion.
-
Fabric Compatibility – Stitch density is optimized to prevent fabric puckering.
-
Efficient Production – Reduces unnecessary thread trims, jump stitches, and overall machine runtime.
-
Machine Compatibility – Correct file formats ensure smooth embroidery operations across various machines.
Manual vs. Automatic Digitizing: Which One is Right for You?
When it comes to digitizing for embroidery, there are two primary methods:
-
Manual Digitizing – A skilled digitizer carefully places stitches for maximum precision. It requires expertise but delivers superior results.
-
Automatic Digitizing – Software generates stitch patterns automatically from an image. While faster, it often lacks accuracy and customization.
Hiring a Professional Embroidery Digitizer
If you’re looking for high-quality digitizing without the learning curve, hiring a professional may be the best choice. When selecting a digitizer, consider:
-
Experience & Portfolio – Review past work for quality assurance.
-
Customer Reviews – Positive feedback indicates reliability and skill.
-
Turnaround Time – A balance between speed and accuracy is crucial.
-
Machine Compatibility – Ensure the digitizer provides files in the required format for your embroidery machine.
Common Challenges in Digitizing & How to Overcome Them
Embroidery digitizing isn’t without its hurdles. Here are some common issues and solutions:
-
Excessive Stitch Density – Leads to fabric puckering. Solution: Adjust stitch spacing and apply underlay stitches.
-
Thread Breaks – Can occur due to improper stitch sequencing. Solution: Optimize stitch order and machine tension settings.
-
Misalignment Issues – Design shifting can ruin embroidery quality. Solution: Use stabilizers and proper hooping techniques.
Final Thoughts
Digitizing for embroidery is both an art and a science. Whether you’re learning to digitize yourself or hiring a professional, mastering the process ensures stunning, high-quality embroidery designs. By understanding stitch types, optimizing pathways, and using the right software, you can elevate your embroidery projects and achieve flawless results every time.


Comments
0 comment