views

QuickBooks has been widely accepted by businesses all over the world. All information in this program is stored in the form of the Company files. These files hold all the information on financial transactions, employees, customers, inventory, settings, and accounts. As such, users should master the procedure to create a Company file in QuickBooks Desktop.
Steps to Create a New QuickBooks Desktop Company File
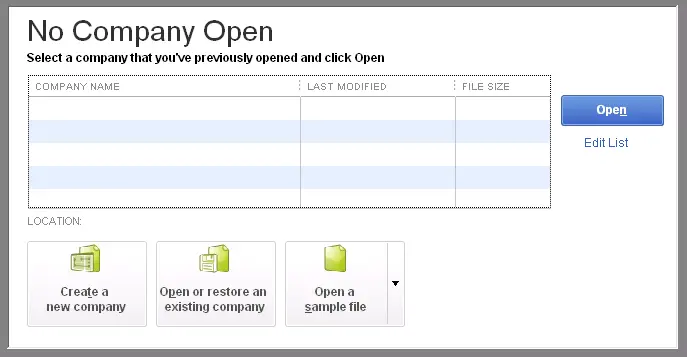
Once you start QuickBooks, you will have two options -
- To create a new company file
- Open an existing file
So, let us look at every step in creating a company file.
Step 1: Enter company details
You must enter basic information about the business, like industry, name, federal tax ID, phone number, and month that fiscal year ends for your reports. This helps QuickBooks set up settings, templates, and charts of accounts that work best for industry and business. You should be careful about filling in information because it is hard to change it later.
Step 2: Select industry and business type
In QuickBooks accounting software, there are options to select the industry vertical and specify the type of business, such as retail store, contractor, and professional services firm. You must select the right category with proper account types for core activities such as payroll, inventory, sales, etc. You can modify accounts later if needed.
Step 3: Configure income and expense training
It is possible to specify options for tracking expenses as well as revenue: -
- Turn on progress invoicing if you invoice clients in phases for projects.
- You need to enable inventory tracking when selling physical products.
- Set up accounts payable to help track bills from vendors.
All these options integrate the features in QuickBooks desktop to meet workflow needs. Make sure what is relevant now, but you can change the settings later.
Step 4: Review the company setup
- In the last setup Window, you need to review all the company information and preferences you entered.
- After that go through the configuration and then head back to modify any information to be updated.
- Finally, hit a click “create company file” in QuickBooks to finish creating the new Company file.

- Rename the company file and save it on your hard drive or server with QBW extension.
Step 5: Customize your company file
Once you have the core company file created, you can customize it further before doing any accounting work.
Customize the company file
Once you have the core file ready, you can customize it before beginning any accounting work.
Configure preferences
Open Edit Preferences and then familiarize yourself with different preference options. You can update options like accounts, payroll, payments, bills, etc, as per workflows.
Step 6: Add Logo
You can upload the business logo into the company file through company settings.
Step 7: Review chart of accounts
Chart of accounts is a repository of accounts needed for the creation of expenses, assets etc. Users can modify the account names and can also create new ones including subaccounts.
Conclusion
The walkthrough should help you create a company file in QuickBooks Desktop. If you are facing any intricacy, then you can simply reach out to our QuickBooks desktop support team of experts at 1-800-761-1787.


![ELD Compliance Software Market Share Forecast Report [2032]](https://s3.us-west-2.amazonaws.com/timessquarereporter.com/upload/media/posts/2024-09/11/eld-compliance-software-market-share-forecast-report-2032_1726054354-s.jpg)
Comments
0 comment